slide_xmas

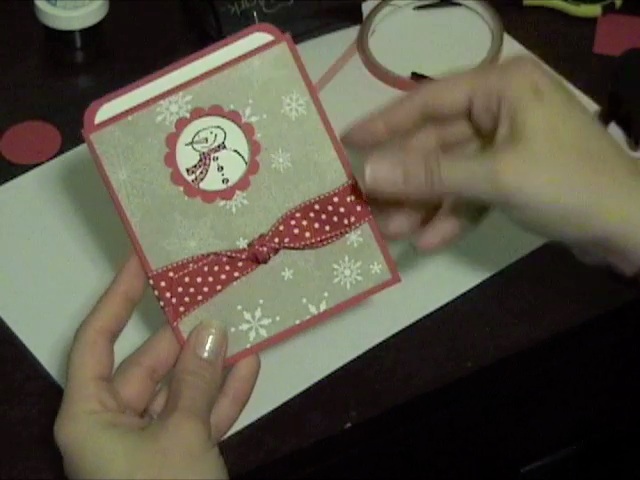
This is the card I made in my video tutorial (see previous post). Outside pocket was made using Real Red textured card stock, with Christmas Cocoa DSP on the front panel. Inside, the slide out portion was made using Real Red and Whisper White card stock, with the upper corners rounded by the Corner Rounder Punch.

Stamp is from Snow Buddies (a Level 2 Hostess set) that I embossed with black embossing powder, colored in with Aquapainter. The window on the front was made from 1 3/8″ Circle Punch and Scallop Circle Punch. The ribbon is Real Red Polka Dot Ribbon.

slide_xmas2

It’s hard to see in the photo, but I punched the insert with the Slit Punch to make it a gift card holder.

slide_baby1

This version uses Urban Oasis DSP (retired) as the outer jacket. The inside is Kiwi Kiss layered with Whisper White card stock. Again, I used the Corner Rounder Punch on the tops only. Stamp is from Goody Goody Gumdrops (Retired Hostess Set), embossed with Black embossing powder and colored in with Aquapainter. To finish it off, I tied some Very Vanilla 5/8″ Grosgrain Ribbon around the card.

slide_baby2

Yet another version in a more girly color scheme. This would make a great baby shower card for a little girl, or simply change the stamp image to a cupcake and you have a fun birthday card! Card base is chocolate chip, layered with Sweet Always DSP in the polka dot pattern. I ran a strip of regal rose card stock through the crimper, attached it to the front with dimensionals and then tied some fabulous Chocolate Chip Satin Ribbon around the front.

slide_baby3

Finally, this is the version I’ll be giving to my friend for her baby shower. Inside, I made a slit using the Slit Punch to hold a gift card. The outside is Barely Banana card stock, layered with Delicate Dots DSP (from last SAB). The green is Kiwi Kiss and the duck is from Goody Goody Gumdrops.

IMG_0930

Here is a video demonstrating how to make a Slide Out Pocket Card. This particular one is a Christmas gift card holder but I also show examples of baby shower card versions.

P.S. Making a video is harder than I thought! I’m sorry the lighting isn’t great I’ll know better for next time. All dimensions will be listed at the bottom of this post in case you miss something in the video. Thanks for watching!

autumn copy

I think I made this page last year but never uploaded it. My daughter was only 2 months old on her first Halloween so we didn’t go trick or treating. She really wasn’t a fan of her chicken costume either! Since that season was very low key around our house, I decided to lump together Halloween and Thanksgiving, making one scrapbook page for both holidays.

The background is the retired Halloween DSP in pumpkin pie with some striping. I used the tree from Season of Friendship, stamped in chocolate chip with different color leaves, and trimmed it out. The pumpkins are from Year After Year, watercolored with pumpkin pie ink and trimmed out as well.

Across the top of the page, I used a strip of chocolate chip DSP and the letters were made using the Cuttlebug Alphabet (I don’t remember the name). At the bottom, I printed my journaling from the computer, matting it on chocolate chip card stock, and adding some Soft Subtles Buttons tied with Hemp Twine in the corner for embellishment.

IMG_0890 copy

When I saw this card I just knew the Corduroy Brads would make perfect “ornaments”. The card base is baja breeze, layered with the Holiday DSP Bulk Buy in a striped design. The circles were made using Circle Nestabilities (2nd and 3rd largest) from Real Red textured card stock and whisper white card stock.

Using the cropadile, I punched 3 holes in the white circle and added large corduroy brads (kiwi kiss, baja breeze, basic gray). To secure them, I added a glue dot to the back of each so they wouldn’t spin around. Next, adhere the white circle to the red circle and the red circle to the DSP base. I then took some Silver Cord and wrapped it around the brads, bringing it up around the back of the DSP. A line of snail on the back of the DSP keeps the cord ends secure.

To finish off the card, I attached the DSP to the baja breeze base and stamped “Merry Christmas” from Season of Joy in Real Red on whisper white card stock. I then trimmed out the sentiment and attached it to the front using dimensionals.

IMG_0892 copy

The first card I made uses Night of Navy card stock as the base. I stamped it with the swirl from Season of Joy in Versamark and heat embossed it with clear embossing powder.

The main image is the christmas tree from Season of Joy, again stamped in Versamark, heat embossed with Silver embossing powder on Night of Navy card stock. I layered that onto a piece of Silver card stock. Next, I punched a hole at the bottom of that layer with the crop a dile and added a glittered corduroy brad. I just put a large glue dot over the top of the Basic Gray Corduroy Brad and dipped it in Dazzling Diamonds glitter. It’s that easy!

After attaching the brad and adhering the layer to the base with dimensionals, I stamped “sparkle” from Warm Words in Versamark on Night of Navy card stock and heat embossed it using silver embossing powder. Then, I punched it out with the Word Window Punch and layered it with a silver backing made with the Modern Label Punch.

For a little added touch, I took Silver Cord and looped it above the brad, attaching the ends to the back of the Modern Label with glue dots. Finally, I added some dimensionals to adhere it to the card base.

IMG_0896 copy

This next card has a lot of sparkle! The card base here is Not Quite Navy, stamped with the snowflake from Season of Joy in Platinum Shimmer Paint. I also sponged the Shimmer Paint onto the christmas tree image from the same stamp set, stamping it on NQ Navy and paper piercing around the edges. That was layered with Silver card stock.

The sentiment is from Christmas Greetings, stamped in Platinum Shimmer Paint as well. Since the shimmer paint dries so quickly, this card took hardly any time to make and assemble. It’s like getting the look of silver embossing in one easy step!

In the northeast, it’s peak leaf season. The trees are colored with red, yellow, gold, orange, and rust. I tried to use some of those colors in these pages, which I intend to fill with pictures of my daughter playing in a pile of leaves.

IMG_0885 copy IMG_0883 copy

These 12×12 pages are made from Crushed Curry textured card stock for the base. Across the bottom half of page 1, I used Autumn Vines DSP. In the center, I layered chocolate chip card stock with Really Rust DSP from Autumn Vines and whisper white. The cork letters were from a craft store. I mounted some of them onto 1 3/8″ Circles layered with 1 1/8″ circle of DSP.

The photo mats are really rust and crushed curry card stock that I ran through the Crimper for some texture, adhered to the page with dimensionals. I made faux photo corners by placing a chocolate chip square underneath the upper corners of the DSP photo mat on page 1.

On page 2, I took a scallop chipboard frame and tied some Chocolate Chip 5/8″ Grosgrain and Crushed Curry Polka Dot grosgrain around it. Underneath, I stamped the pumpkin from Autumn Harvest in Brown stazon ink, and watercolored it with Tangerine Tango ink and my Aquapainter.

cookie swap-001

All images (c) Stampin Up

This was made using My Digital Studio. I was playing around with it and designed a flyer for a cookie swap using the Christmas Jingle Designer Kit elements. It’s so easy to make your own flyers, signs, cards, scrapbook albums, even DVDs with this software.

I’m not sure what cookie I’ll be bringing to the swap yet. Recipe testing will begin shortly though!

Making a blog banner is so easy using Stampin Up’s My Digital Studio.  Here are step by step directions on how to turn your MDS creation into a work of art you can display on your blog. Click on the images to enlarge.

Step 1: Create your image in MDS

blog_banner1

As you can see, I made my image in MDS by opening up a blank 8 1/2″ x 11″ page and kept my design approximately 3 1/2″ x 11″ (roughly the size of my blog header). Save your file as a .JPEG in MDS.

Step 2: Open up your My Digital Studio Projects Folder and select the folder where your .JPEG is saved (Mine is called “Blog Banner_JPEG”)

blog_banner2

Step 3: Right Click on the .JPEG file and select “Open with Photoshop”

blog_banner3

Step 4: Crop your image in Photoshop so there is no white space showing

blog_banner5

Step 5:Click Image/Image Size

blog_banner6

Step 6: Resize your image

blog_banner7

Resizing may be necessary before uploading the image to your blog. To resize and avoid distortion (a)Deselect “Scale Styles” box; (b) Choose “Bicubic Sharper” at the bottom; and (c) Set the pixel width to 800 (you can play around with the number but close to this seems to work for most blogs). Note: The pixel value for height will automatically adjust once you input 800 for the width. Click OK.

Now that you’ve resized your image, make sure to view it at 100%. It should not look pixelated or blurry. If it looks good, then you’re done! Uploading to your blog will vary depending on which service you use (wordpress, blogspot, etc.)

For my wordpress blog, I saved the .JPEG file to my site theme’s image folder, and made a simple HTML anchor link with the image. Then, I placed the anchor into the header.php file of my theme so it would show up on my blog.  Generally, the code will appear as shown below. Yours may vary so it may not work for everyone. Try substituting in your information as follows:

<a href=”http://www.yoursite.com” alt=”http://yoursite.com“><img src=”http://yoursite.com/wp-content/themes/your-theme/images/yourbannerfilename.jpg“</img></a>


My grandparents are celebrating their 55th wedding anniversary soon and guess who’s in charge of making the invitations??  That’s right, me!

I don’t know why we didn’t have a 50th anniversary party for them?  Maybe it was because my grandfather was ill at that time. I don’t remember, but in any event, their 55th is coming and they want to celebrate.

Option 1:

GRAinvite_1

This is so sparkly in real life, I tried my best to get it on camera. The base is rich razzleberry card stock, layered with a very vanilla panel. On top, I ran a 4″ x 5 1/4″ piece of vellum through the Big Shot using the Manhattan Flowers Embossing Folder. Then, with the debossed side up (raised side down), I filled in the image with my fine tip glue pen and added Dazzling Diamonds Glitter. I love this result! (See here for another example).

To finish it off, I stamped “You’re Invited” from Sincere Salutations in Rich Razzleberry ink on the vellum and tied some polka dot rich razzleberry ribbon in a knot and adhered it to the top of the card using a glue dot.

Option 2:

GRAinvite_2

So simple but so elegant. The card base is close to cocoa, layered with an ivory shimmer paper which I embossed using the Manhattan Flowers Embossing Folder and the Big Shot. In the upper right corner, I stamped “You’re Invited” from For the Bride in Versamark and embossed it with Gold Embossing Powder. The ribbon was purchased from a craft store, and it’s a shimmery version of close to cocoa.

Option 3:

GRAinvite_3

This version is well suited for a 50th Anniversary card. The base is close to cocoa again, layered with very vanilla which I stamped with En Francais in close to cocoa ink. A vellum overlay was stamped with the cake from For the Bride in Versamark and embossed with Gold Embossing Powder.

The ribbon was purchased from a craft store and the “You’re Invited” from For the Bride was stamped on very vanilla card stock in Versamark and embossed with Gold Embossing Powder as well. I punched out the sentiment using the Modern Label Punch and adhered it using dimensionals.

Option 4:

GRAinvite_4

This is beautiful, but not really my grandparents’ style. The base is chocolate chip textured card stock, layered with whisper white. On top, the vellum layer was embossed using the Manhattan Flowers Embossing Folder and then with the debossed side up (raised side down) I brayered over the vellum using Baja breeze ink.

At the top, I added ribbon from Valet Ribbon Originals (retired). The sentiment is from Please Come stamped in Baja Breeze on whisper white. I punched it out with the Word Window Punch and mounted it on chocolate chip card stock punched out with the Modern Label Punch.

IMG_0805

Fall is my favorite time of year, one of the reasons being it’s Pumpkin Season!

The card I made above is based on this card made by Brandi Wiggins. I used her idea of making a 3D Pumpkin using the Scallop Oval Punch. The card base is Very Vanilla, layered with Autumn Vine DSP, one of which was cut using the Top Note Die. I made the pumpkin using Dusty Durango textured card stock punched with the Scallop Oval Punch, each one folded in half. The stem is made from Wild Wasabi Stitched Ribbon.

To finish the card, I stamped “happy” from Happy Everything in chocolate chip ink at the bottom. It would make a great Halloween card, Thanksgiving card, or even a fall Birthday card!

Related Posts with Thumbnails