Whimsical Autumn Wedding Invitation

I came across a similar wedding invitation last year when looking for inspiration for my brother-in-law’s fall wedding invitations. You can see the design they decided on here.

This version is a sample I created for a client (hi Erica). It was created using My Digital Studio. I used a combination of brush stamp sets including Cheep Talk, Circle Circus, and Bold Branches. The finished size is 5″x7″. After printing on Very Vanilla card stock, I layered it with More Mustard and Chocolate Chip card stock.

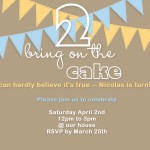
To give it a bit more dimension, I used Versamark marker and Clear Embossing powder on the circles and the bird. This really makes it pop and gives it a more polished look. It’s difficult to photograph, but it looks great in person!

My Digital Studio 2nd Birthday Party Invitations

I love using My Digital Studio (MDS) to create invitations. Sometimes I create a project digitally first and then copy it “in real life”. Other times, I print straight from the computer (as was the case with this year’s Christmas cards).  I’ve gotten really comfortable using the MDS program, and I find it allows me to be just as creative as if I were sitting at my desk surrounded by all my papers, ink, and stamps.

My nephew is turning 2 soon, and my sister asked me to make invitations for his birthday party. I made some samples for her using MDS, and I thought I would share some of them with you.

I love how bright and cheerful this one turned out!  To begin, I opened MDS and chose CARDS in the New Project Options, POSTCARD, 7″ X 5″ LANDSCAPE and the CREATE YOUR OWN option.  The background was made by choosing Bashful Blue card stock as the background. Then, I added a TEXT BOX and wrote “Celebrate”. To create that transparent box around the text, I added a PUNCH in the square shape, and stretched it out to frame the text. I chose to FILL the punch shape with Whisper White and then lowered the OPACITY to make it more transparent.

I added brads in coordinating colors from the EMBELLISHMENT menu, lining them up across the front of the invitation. Here is a tip: I always add a DROP SHADOW to my embellishments to give them the look of being 3D.

The party information was added using TEXT BOX again. Below that, I created the circles along the bottom by adding the CIRCLE PUNCH in various sizes–resizing, copying, and pasting as I went along. The colors were added using the FILL function, and I added DROP SHADOWS to them so they would pop off the page. In some of the circles, I added the number 2 using the TEXT BOX.

This invitation is a little more clean and simple. Personally, I liked this one very much but my sister did not. The number 2 and the “bring on the cake” digital stamps are from Bring on the Cake in the Occasions Mini Catalog and I LOVE LOVE LOVE IT. I’m a font freak and this stamp set has so many awesome fonts. I also ordered it in clear mount so I can use it for birthday cards and other projects too.

I made this the same way as the invitation above, except the background color is Crumb Cake card stock. The Celebrations Pennants are digital stamp images that come with the Celebrations Digital Kit. I chose Bashful Blue and So Saffron for the pennants.

The rest of the information was added using the TEXT BOXES and that’s it. Quick and easy, modern, but fun. I could see changing the blue to pink and it would make a sweet little girl’s birthday invitation.

My Digital Studio {Winter Scrapbook Pages}

Page 1 of the layout. I used My Digital Studio Christmas Cocoa DSP & accessories. See page 2 below.

I print these pages myself, on my Epson Stylus Photo 1400 printer and 11″x17″ glossy presentation paper. Then, I trim the page down to 11″ x 11″ and mount it onto a 12″x12″ sheet of colored card stock.

Side by side view:

Bad Behavior has blocked 543 access attempts in the last 7 days.

css.php