Make a Wish Birthday Cards

February 1st, 2013 - No Responses

make a wish 1

When I saw this make a wish stamp, I had to have it. Funny enough, it’s from the Make a Wish stamp set in the Occasions Mini 2013 catalog. I like it so much I made 2 cards with it! Actually 3 cards but I gave one away already before taking a picture!

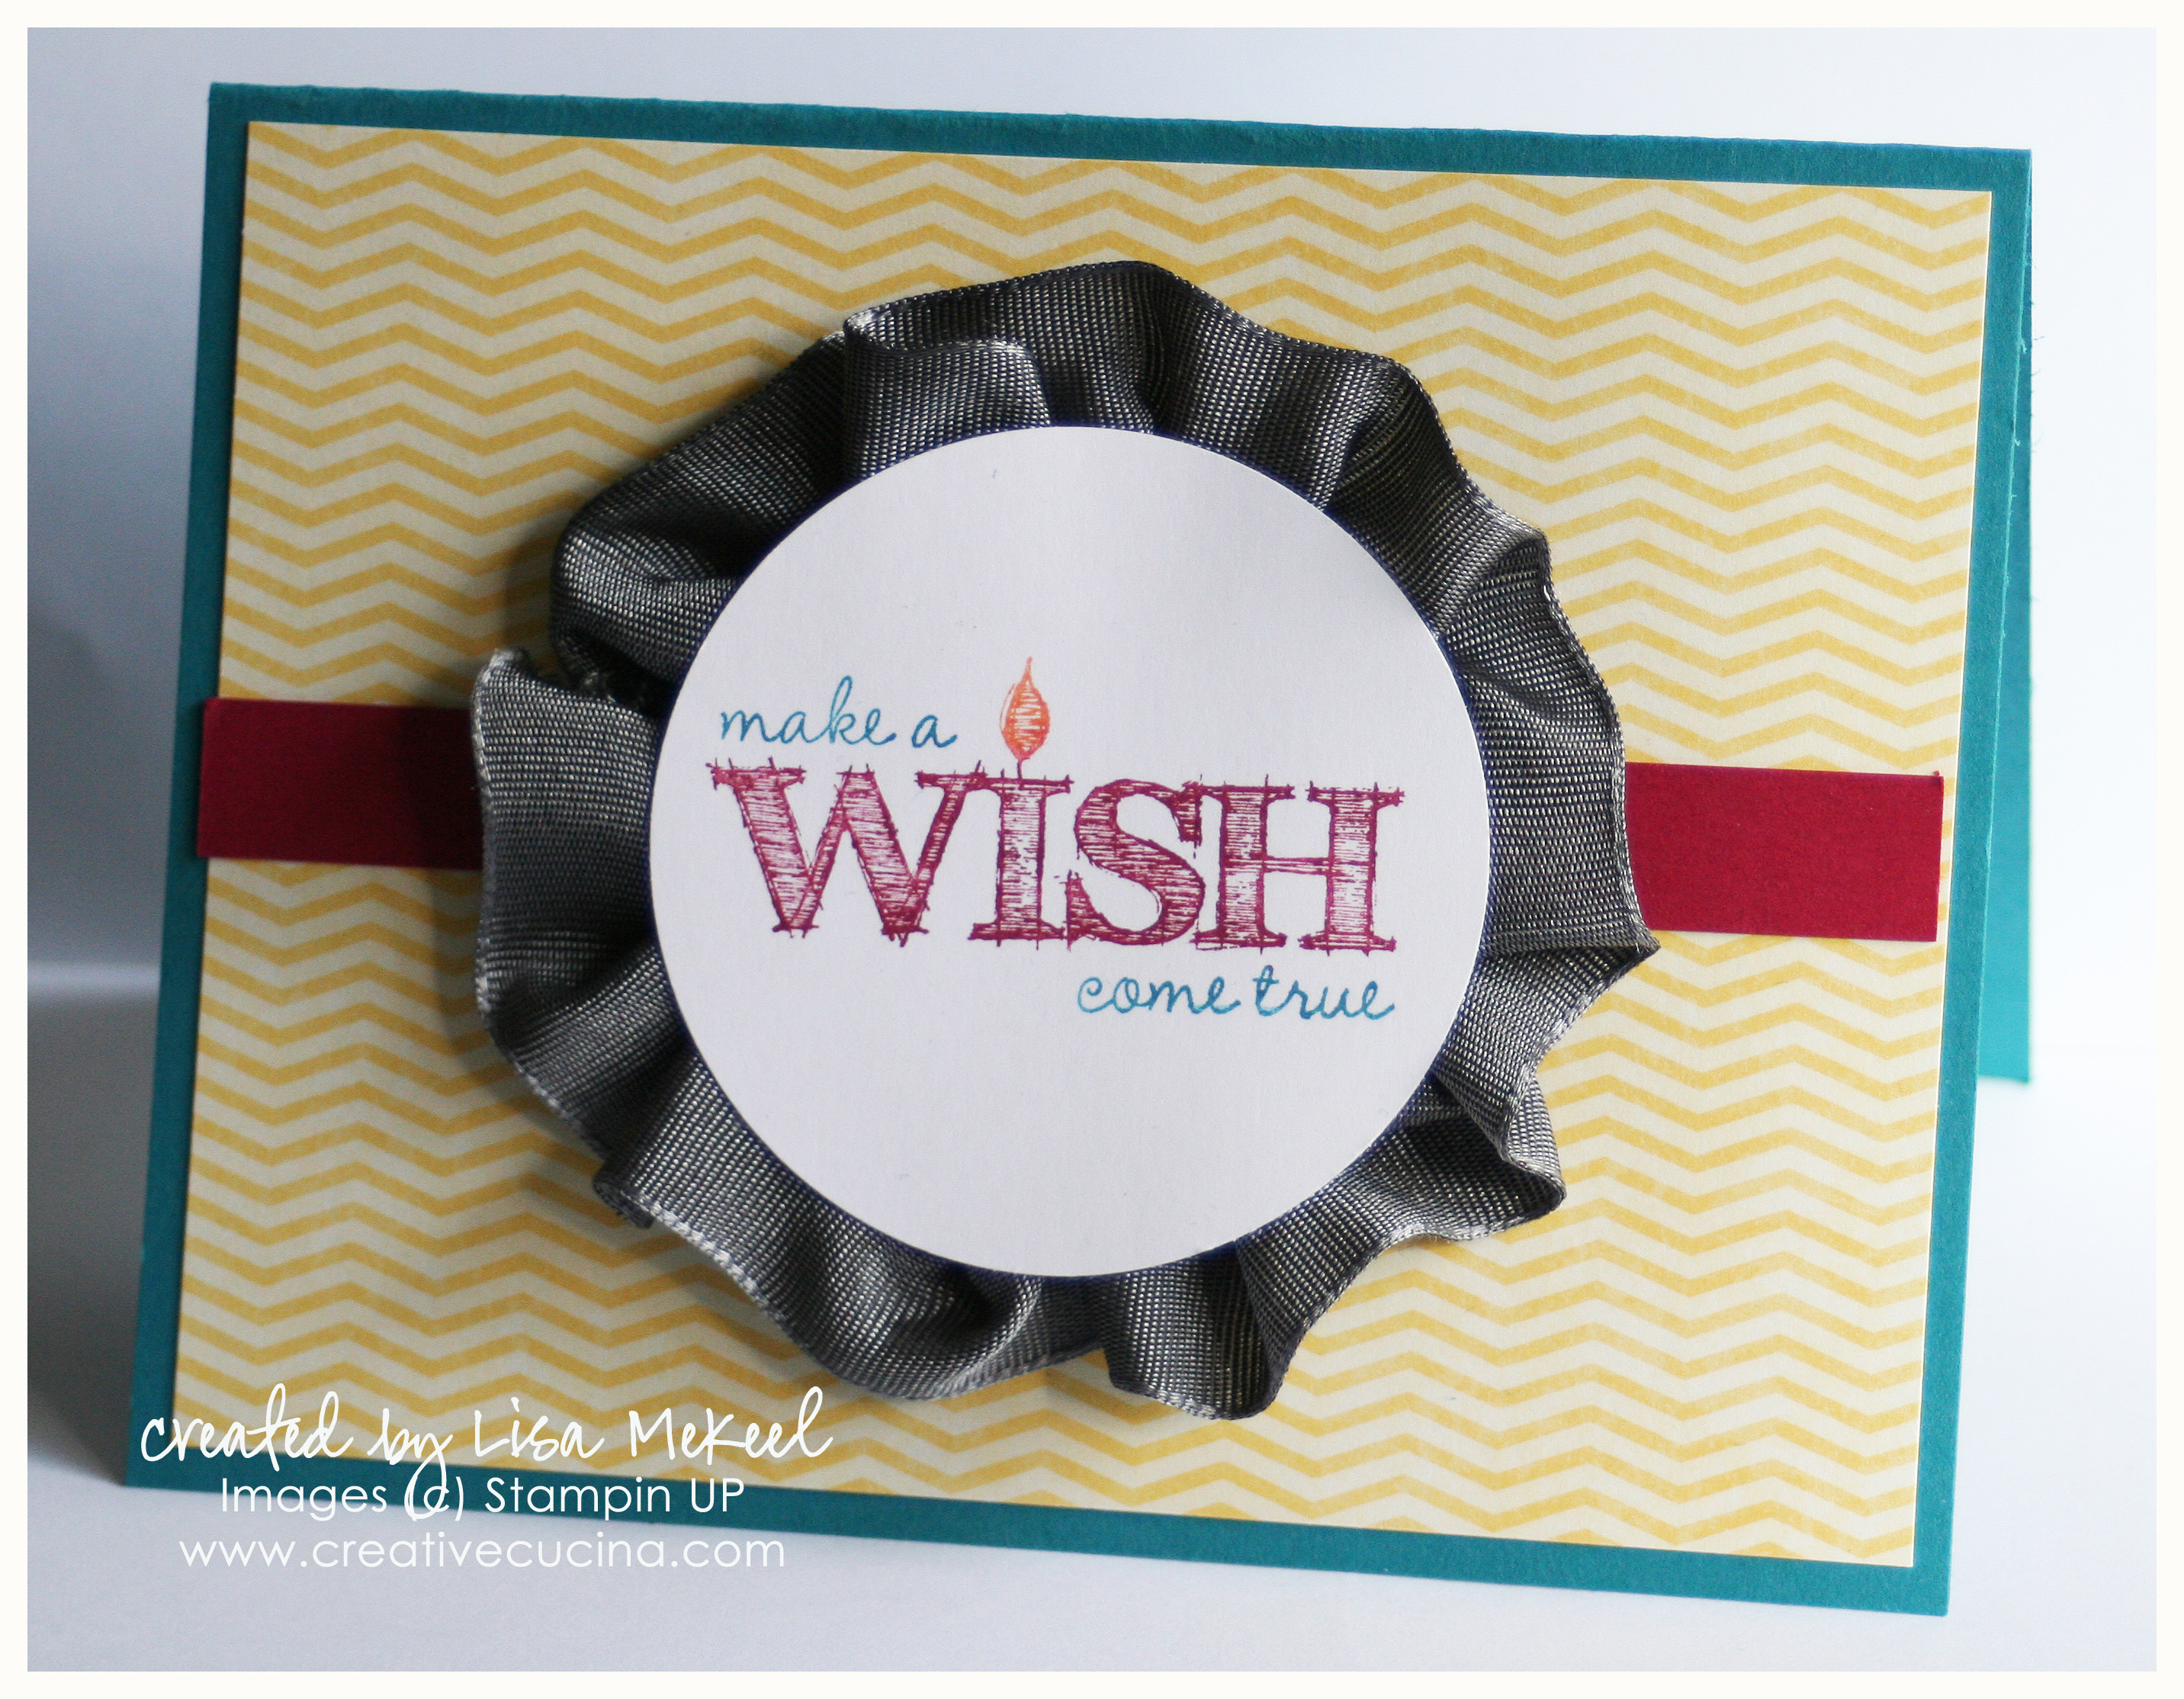
First up is the card pictured above. I used markers to color different parts of the stamp different colors. I stamped it on Whisper White card stock and punched out the circle with the 2 1/2″ Circle Punch.

The base is tempting turquoise, layered with chevron print paper from Rain or Shine Designer Series Paper. The strip of paper is Raspberry Ripple.

For the Basic Gray/Basic Black 1 1/4″ Two-Tone Grosgrain Ribbon medallion, I used the Jumbo Sticky Rounds. Apply the Sticky Round to the back of the Whisper White circle, then take your ribbon and stick the end onto the back of the card stock. Go around the circle, pleating and folding the ribbon as you go. I added a stampin dimensional to the center and a smaller 1” Circle on the back for added stability. Then adhere the medallion to the card base.

make a wish 2

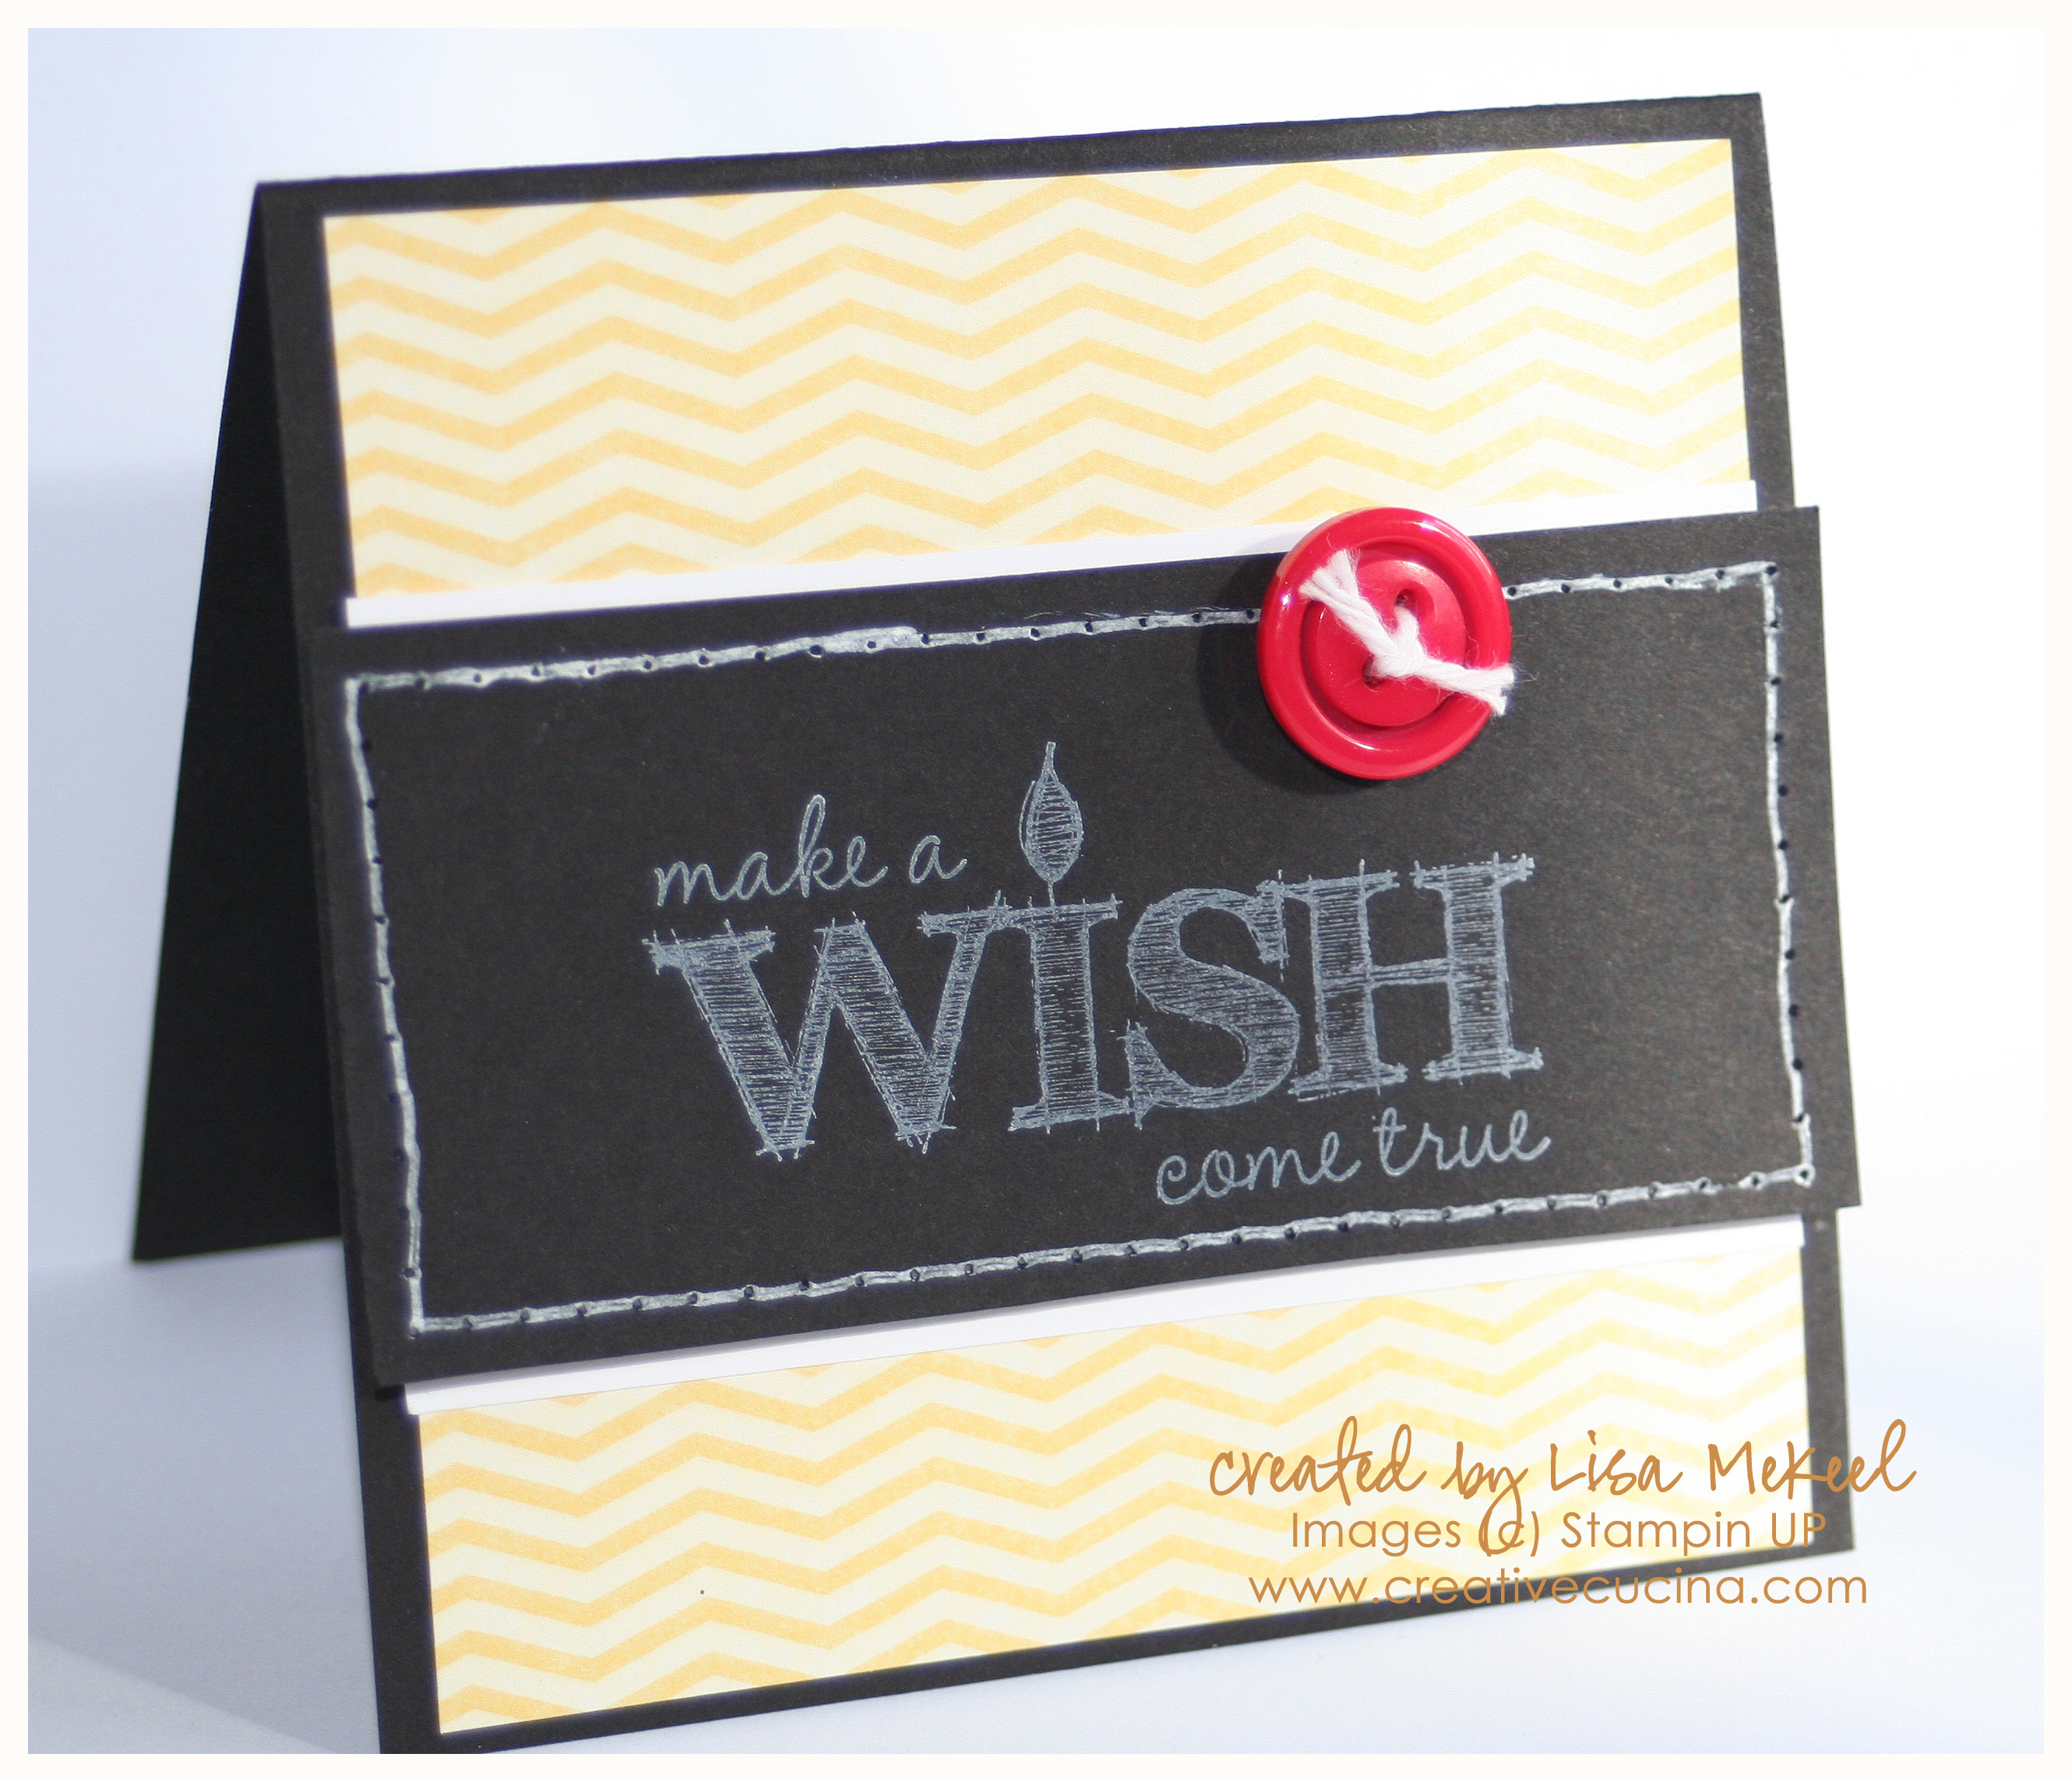
The next card I made is a smaller 3″x3″ square card. I used Basic Black card stock for the base, and another piece of the Daffodil delight chevron DSP from Rain or Shine Designer Series Paper.

This time, I used White Craft ink stamped on Basic Black card stock. Then, I paper pierced around the edge and used a white gel pen to connect the dots and give it a “stitched look”. The black card stock is layered on a piece of Whisper white with stampin dimensionals.

To finish off the card, I added a red button threaded with Bakers Twine.

Valentine’s Day Cake Pops

January 31st, 2013 - 2 Responses

I have made cake pops before, for my daughter’s birthday and other occasions. Monday, I made some just for fun after getting the Williams Sonoma catalog in the mail and seeing their Valentine’s Day treats. They have some really cute heart-shaped cake pops and I got inspired to make some of my own!

Making cake pops is very simple. Bakerella is the queen of cake pops and has lots of examples and step by step instructions on her site. Normally, you crumble up your baked, cooled cake into a bowl, add some frosting, mix it up, and roll the cake into balls with your hands. I decided to do it a little differently this time.

Step 1: Prepare your cake/frosting mixture and turn it out onto a sheet of waxed paper.

Step 2: Cover with another sheet of waxed paper and roll it to about 1″-1 1/4″ thick with a rolling pin

Step 3: Using a heart-shaped cookie cutter (approximately 1 1/2″-2″ across) cut out shapes from your “dough”. Use an offset spatula to lift the hearts out if they don’t come out with the cookie cutter.

Step 4: Take your lollipop stick and poke a hole into the bottom of your heart, going in approximately 1/4 of the way up. Using the same end of the lollipop stick, dip it into melted candy coating/melted chocolate and put it back into the hole. This will help “glue” your heart onto your stick.

At this point, put your cake pops into the refrigerator or freezer to firm up, 15-20 minutes in the freezer, in the refrigerator they can stay for a day covered with plastic wrap.

As for the dipping process, I like to melt my chocolate in a 1 cup pyrex measuring cup in the microwave, then keep it nestled in a 2 cup pyrex measuring cup filled 1/2 full of hot water. Be sure not to get any water in your chocolate or it will seize.

I used Wilton’s pink candy melts with a  teaspoon of crisco to thin it out for easier dipping. I also used Ghirardelli semi-sweet chocolate chips for the Dark Chocolate pops.

For another option, I mixed some Wilton White Candy Melts with the semi-sweet chips. It was delicious! I find the Wilton Milk Chocolate candy melts too sweet for my taste. This was the perfect combination! The only thing with using chocolate chips is that they take longer to set, so just keep that in mind.

I like to store these in ziploc bags in the refrigerator. They taste good cold, but you can also keep them out at room temperature just before serving.

It’s also a good idea to get a block of styrofoam to keep your pops in while they set. I forgot to pick some up, so I had to improvise–used the drip tray to my espresso machine!

Fall Autumn Wedding Pocketfold Invitation {Updated}

January 13th, 2013 - No Responses

Here is an updated version of my pocketfold fall/autumn wedding invitation. It’s 5″x7″ when folded. The invitation panel was made with My Digital Studio and the leaves are hand stamped, from Season of Friendship stamp set.

To keep it closed, I made a belly band out of card stock, embossed with the Fancy Fan Embossing Folder. The medallion is die cut with Apothecary Accents Framelits, stamped with “You’re Invited” from For the Bride stamp set. I paper pierced around the edges with the new Essentials Paper Piercing Pack. Then, to define the edges a bit, I sponged soft suede ink on the edges of the medallion.

Another option for the closure is the medallion with an initial. I stamped the A with Early Espresso ink and added the leaves from Season of Friendship stamped in More Mustard ink around the edges.

Here is the view of the pocketfold invitation fully opened. Enclosure cards fit into the pocket.

Another picture of the inside.

Bad Behavior has blocked 1356 access attempts in the last 7 days.

css.php