Archives for 2009

Happy Birthday, Cupcake

It’s my little cupcake’s 3rd birthday soon, and this is the card I made for her. Card base is Perfect Plum with a layer of Barely Banana. I sponged the edges with Barely Banana ink and paper pierced all the way around the edes as well.

In the center, I used the ribbon weaving technique to add a pop of color. Ribbon is Perfect Plum 1/4″ Grograin and Orchid Opulence 1/4″ Grosgrain.

Directions

  1. Measure piece of card stock by ribbon widths and cut to size. This is the base that you’ll weave the ribbon around.
  2. Cut ribbon lengths so that they’re a little bit longer than your base.
  3. Adhere one end of each ribbon to the back of the base according to the direction it will lay, vertical or horizontal.
  4. Begin weaving, using SNAIL to hold ribbon in place as you weave.
  5. Finish by securing the other end of the ribbon to the back side of your base using Sticky Strip.
  6. Try it with strips of DSP as well!

The cupcake felt sticker is from Martha Stewart and sentiment is from Crazy for Cupcakes.


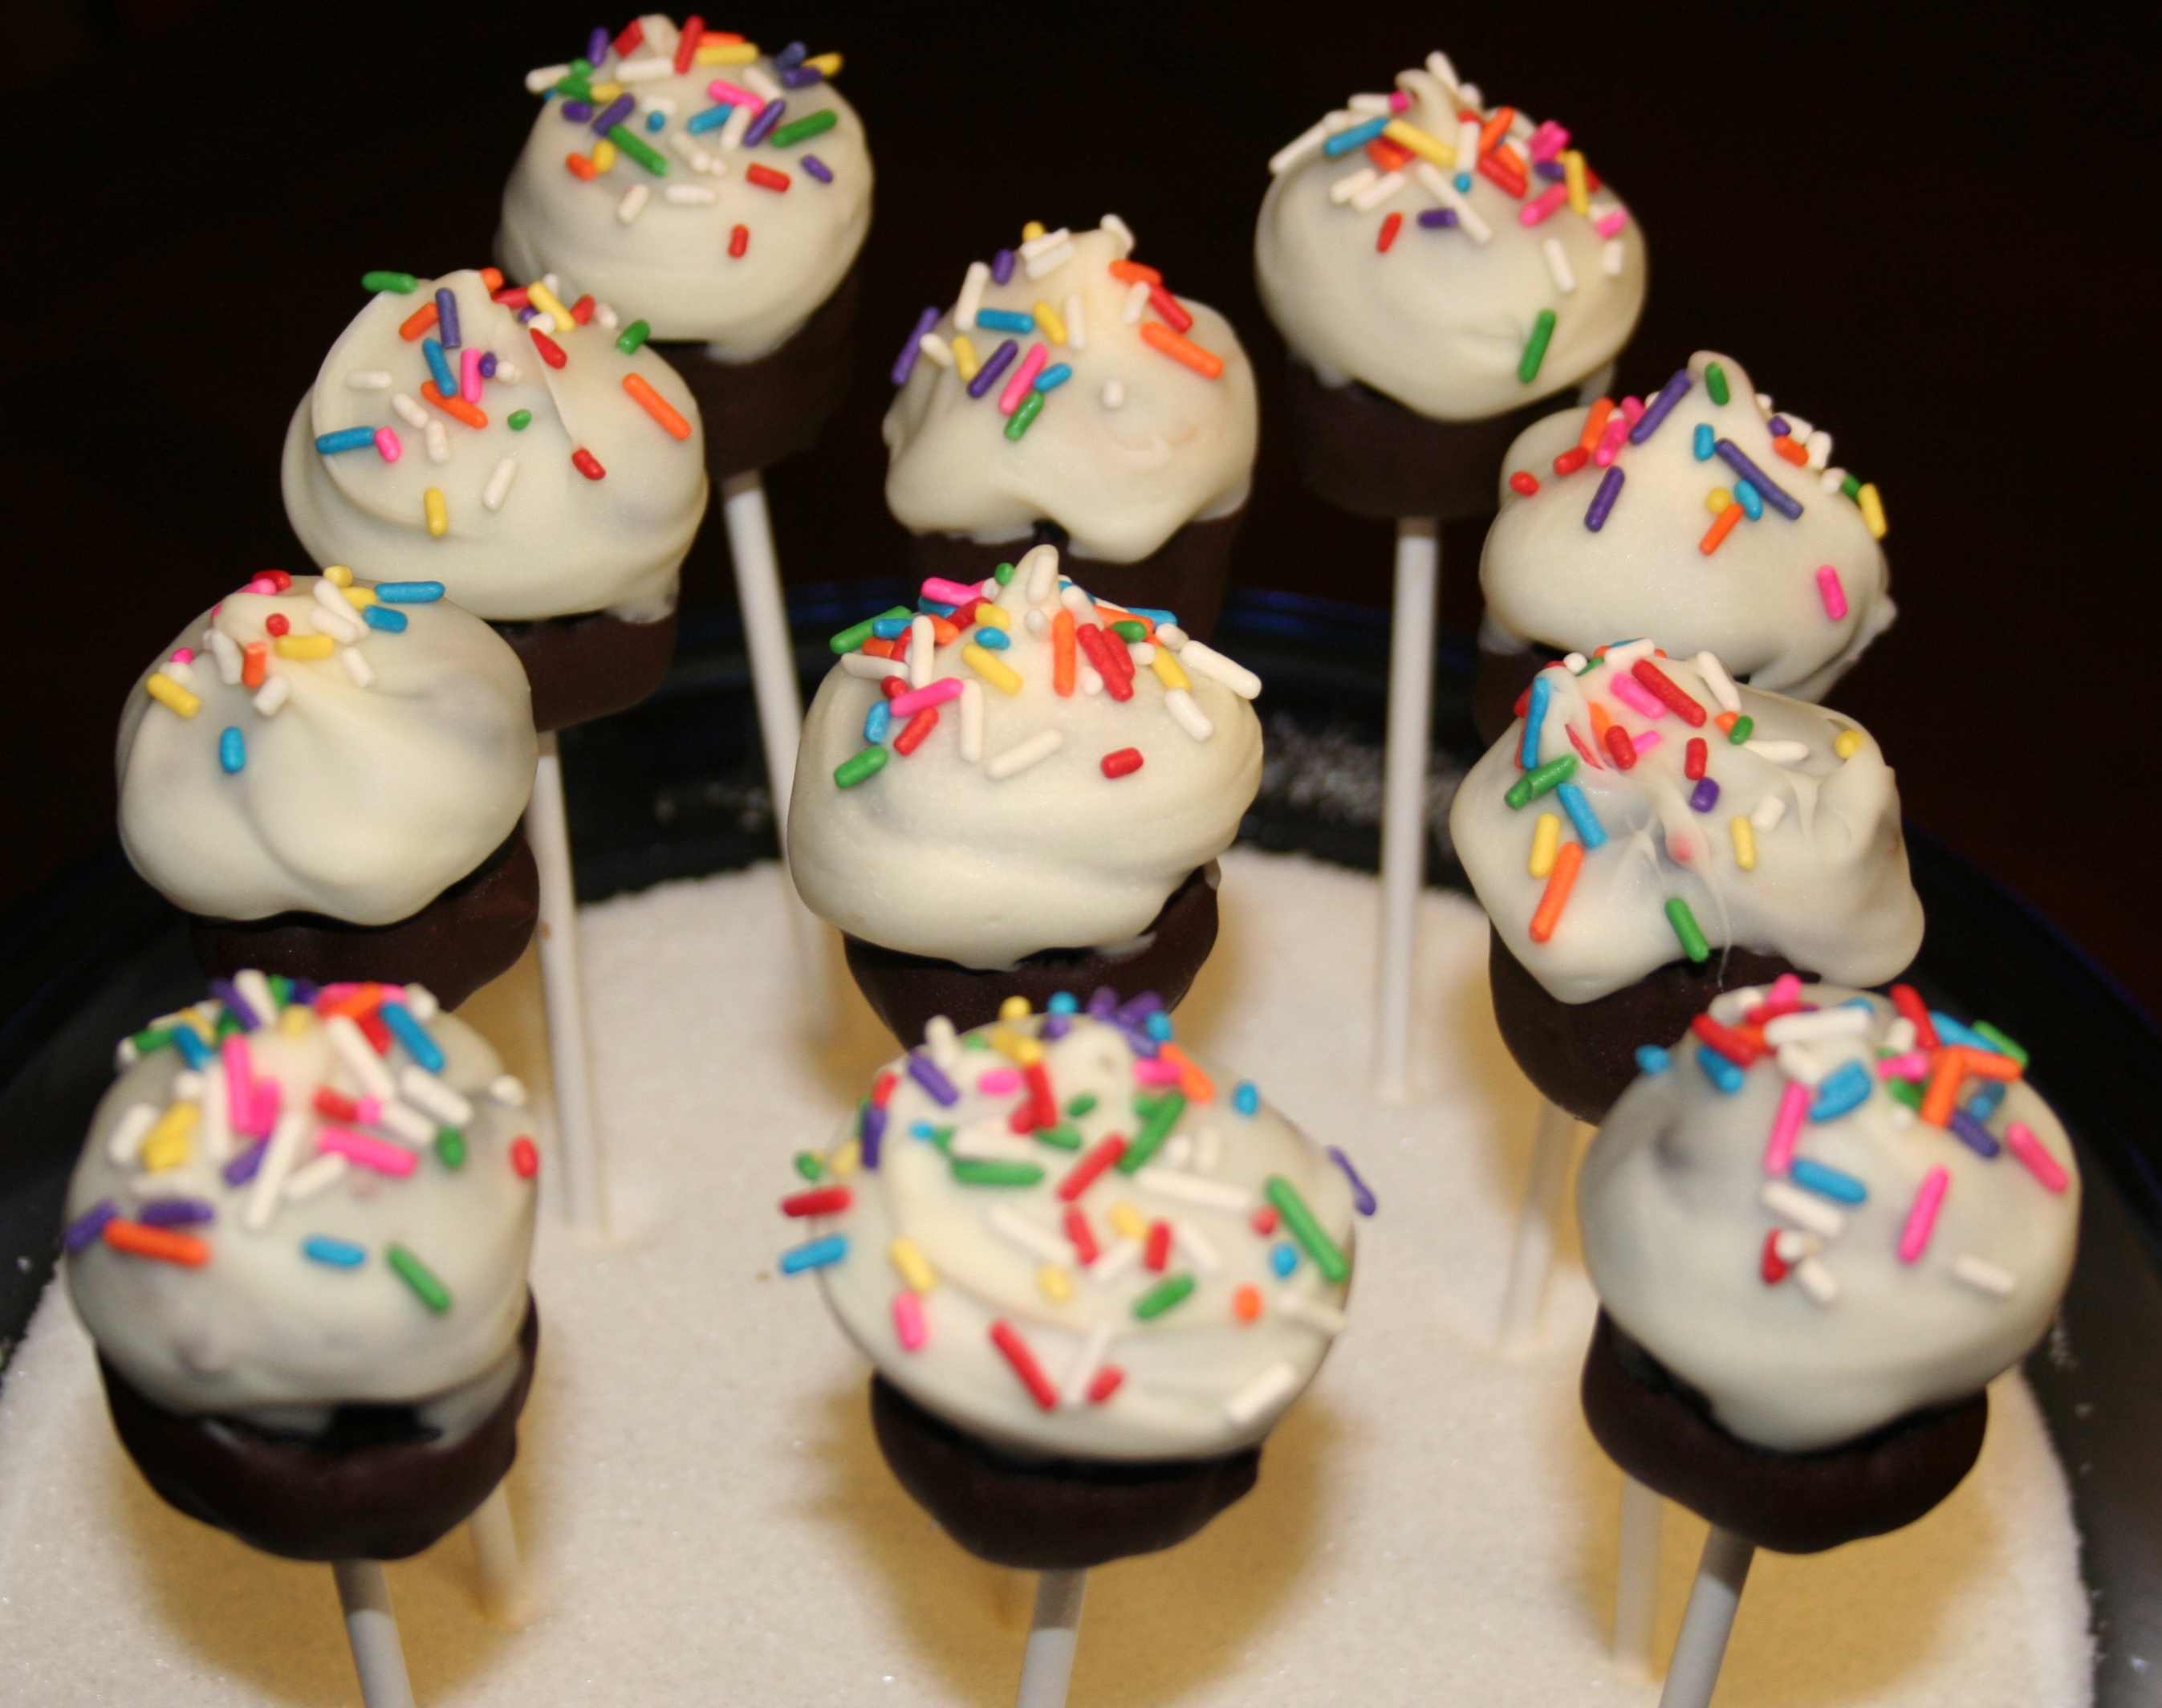
Cupcake Pops

How cute are these?! I saw them on Bakerella’s blog a while ago and made a mental note that I had try these ASAP. My daughter’s upcoming 3rd birthday seemed like the perfect opportunity for some tasty cupcake pops so I tried the recipe and IT WORKED!

Mine did not come out perfect but for my first time I was more than pleased! I was going to make chocolate lollipops using the Candy melts and lollipop molds but that candy is just so sweet I couldn’t tolerate it! That’s how I came across these cupcake pops. They’re really chocolately, not overly sweet, and will please both the kids and adults at the party.

Directions:

  1. Take a 9×13″ baked and cooled cake and crumble it up either using your hands or a food processor.
  2. Mix in a little less than 1 jar of frosting (about 2 cups).
  3. Stir until the cake and frosting is combined and mixture turns into a homogeneous “lump”.
  4. Cover and let chill in the refrigerator or freezer until mixture firms up a bit.
  5. Using a small ice cream scoop or your hands, form “dough” into balls a little smaller than a golf ball, about 1 1/2″ across.
  6. Allow dough to chill again (you can even come back to it the next day).
  7. Roll dough balls into log shape and press bottom into a small flower shaped or fluted cookie cutter. Shape the top of the ball to look like the cupcake top and pop it out of the cookie cutter. See video on Martha Stewart for a great visual.
  8. Dip your cupcake bottom into melted chocolate and place them upside down onto a cookie sheet. Pop a lollipop stick into the bottom (dip it in melted chocolate first). Chill until chocolate sets.
  9. Now you’re ready to dip the tops. I chose white melted chocolate. Dip and swirl around for a frosted cupcake look. Top with sprinkles or other decorations and set lollipop in a styrofoam block or bowl of sugar/salt/rice until set.
  10. Wrap in plastic baggies and tie with a twist tie (optional)

——————Some Tips & Tricks———————-

For my cake pops, I used boxed Betty Crocker Chocolate Fudge Cake. It was easy and since I was going to pulverize the cake anyway, I didn’t bother making the cake from scratch. (Plus I secretly like boxed cake mix better–anyone else???) The frosting was Betty Crocker Milk Chocolate Frosting, but you could use any combination you like.

Instead of straight chocolate candy melts, I used half dark chocolate candy melts (which are still painfully sweet in my opinion) and half Ghiardelli bittersweet chocolate chips. That combination resulted in a rich, dark, chocolately covering.

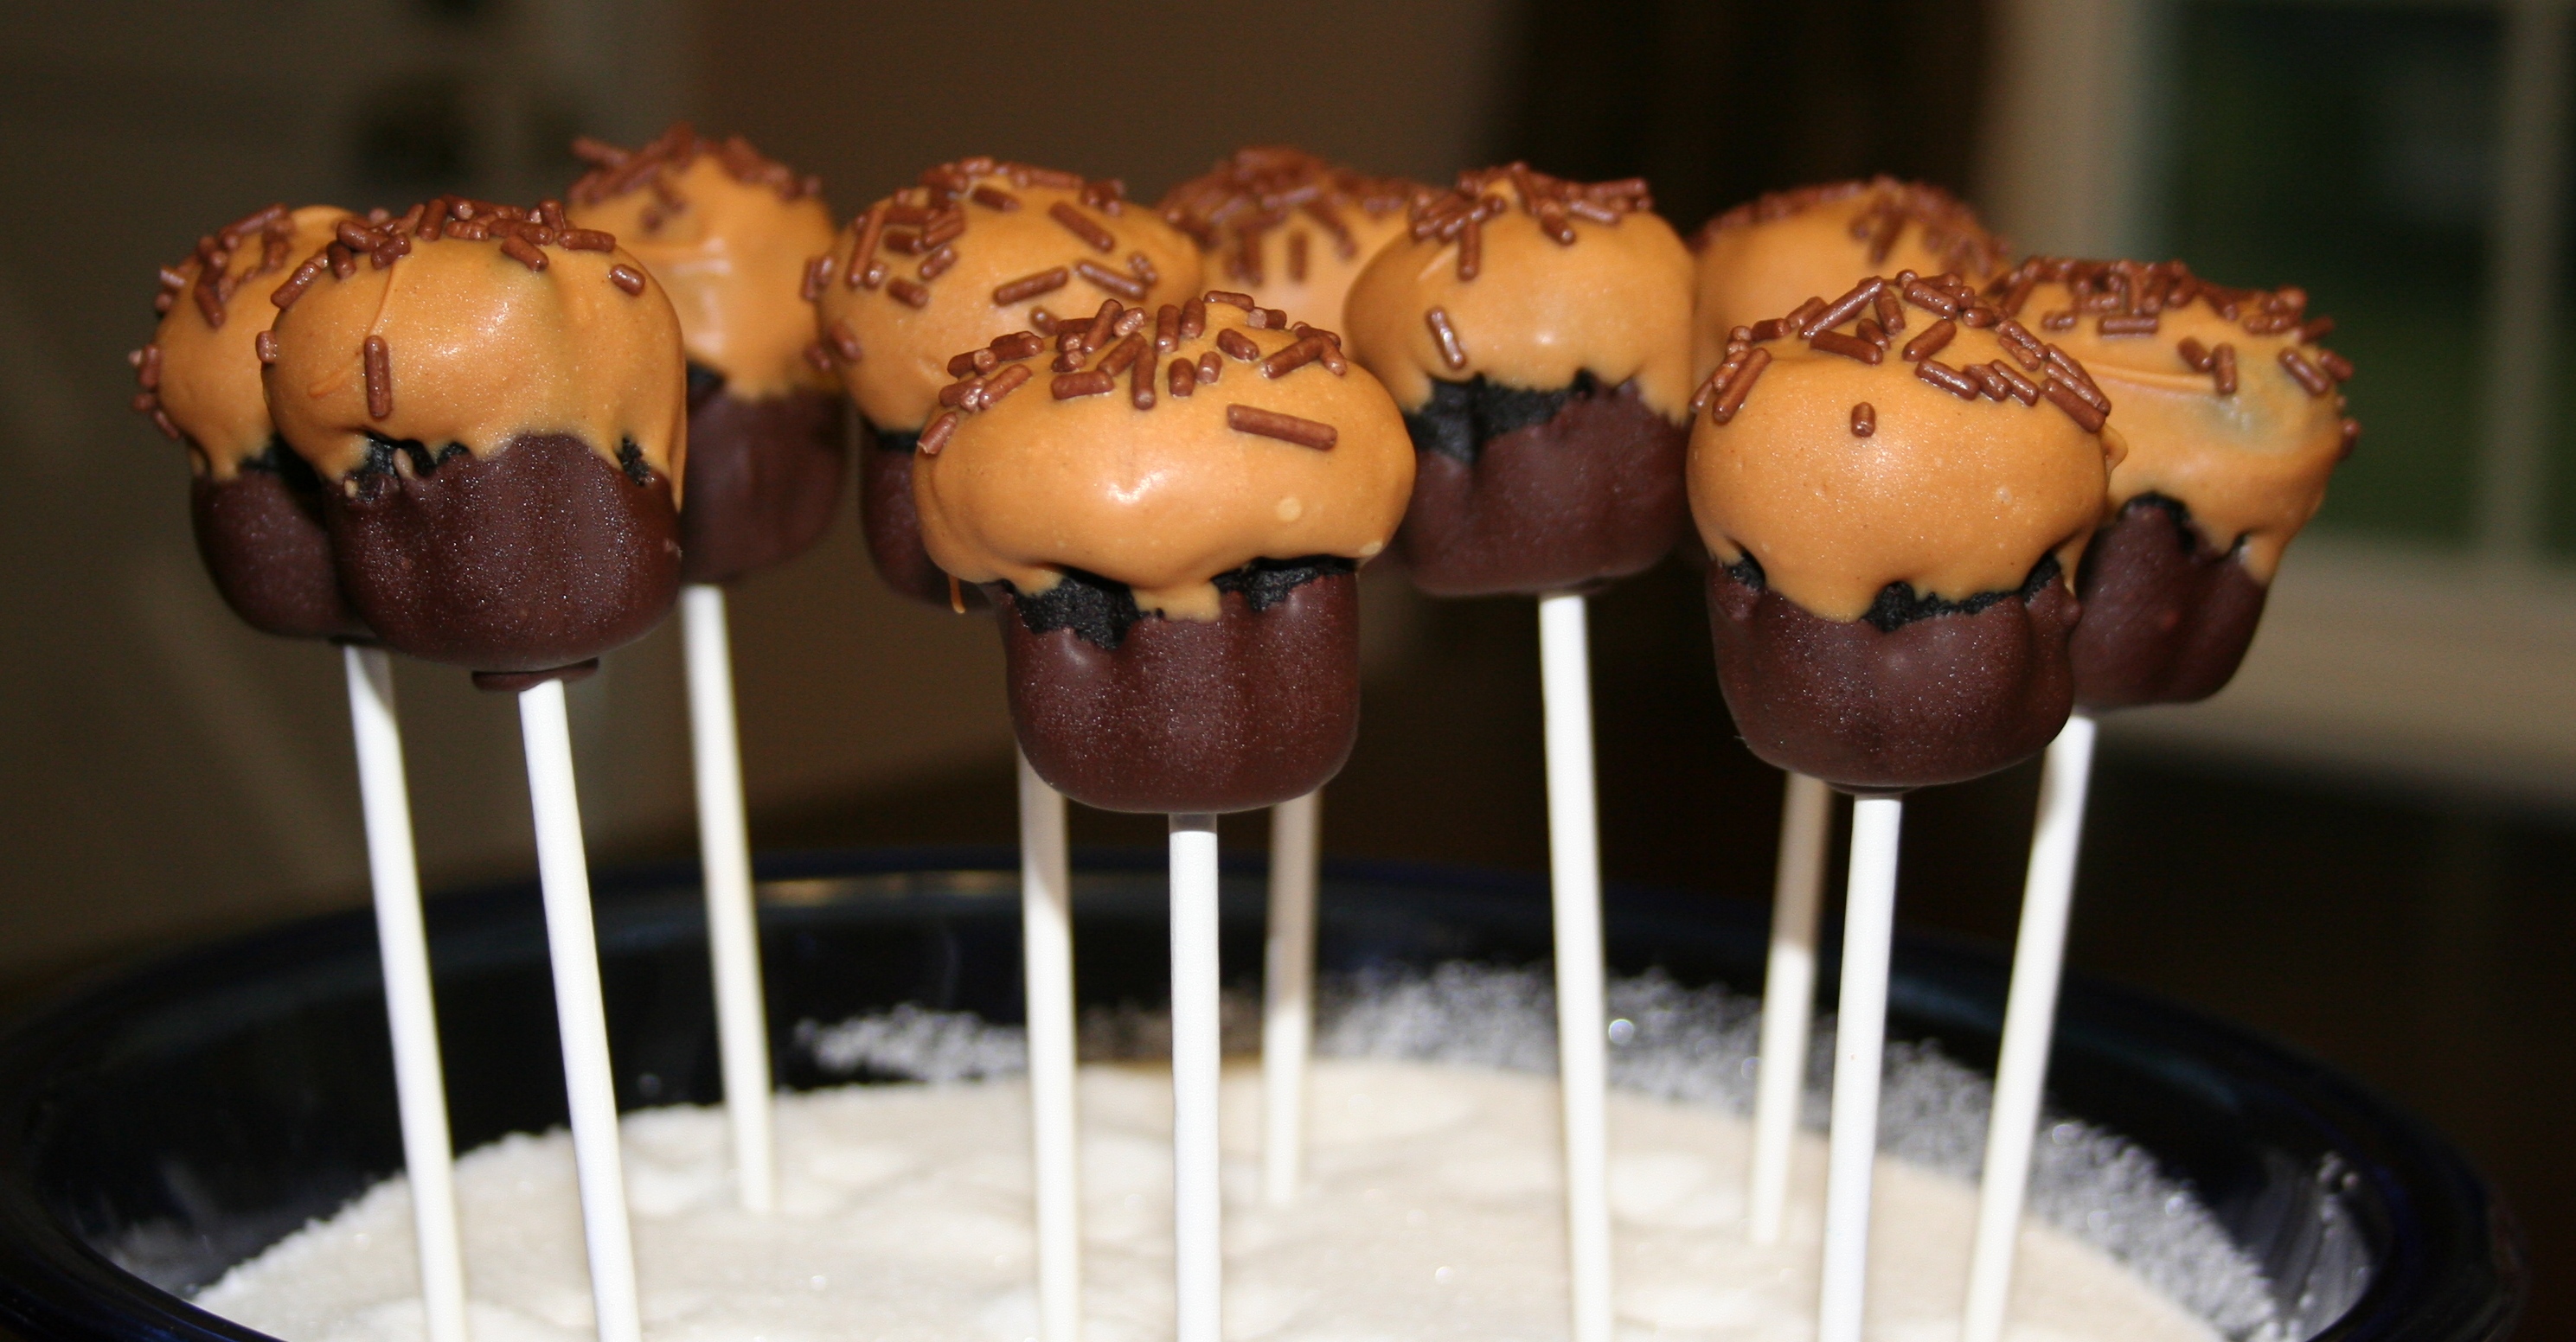
Peanut butter candy melt topping with dark chocolate base and chocolate sprinkles.

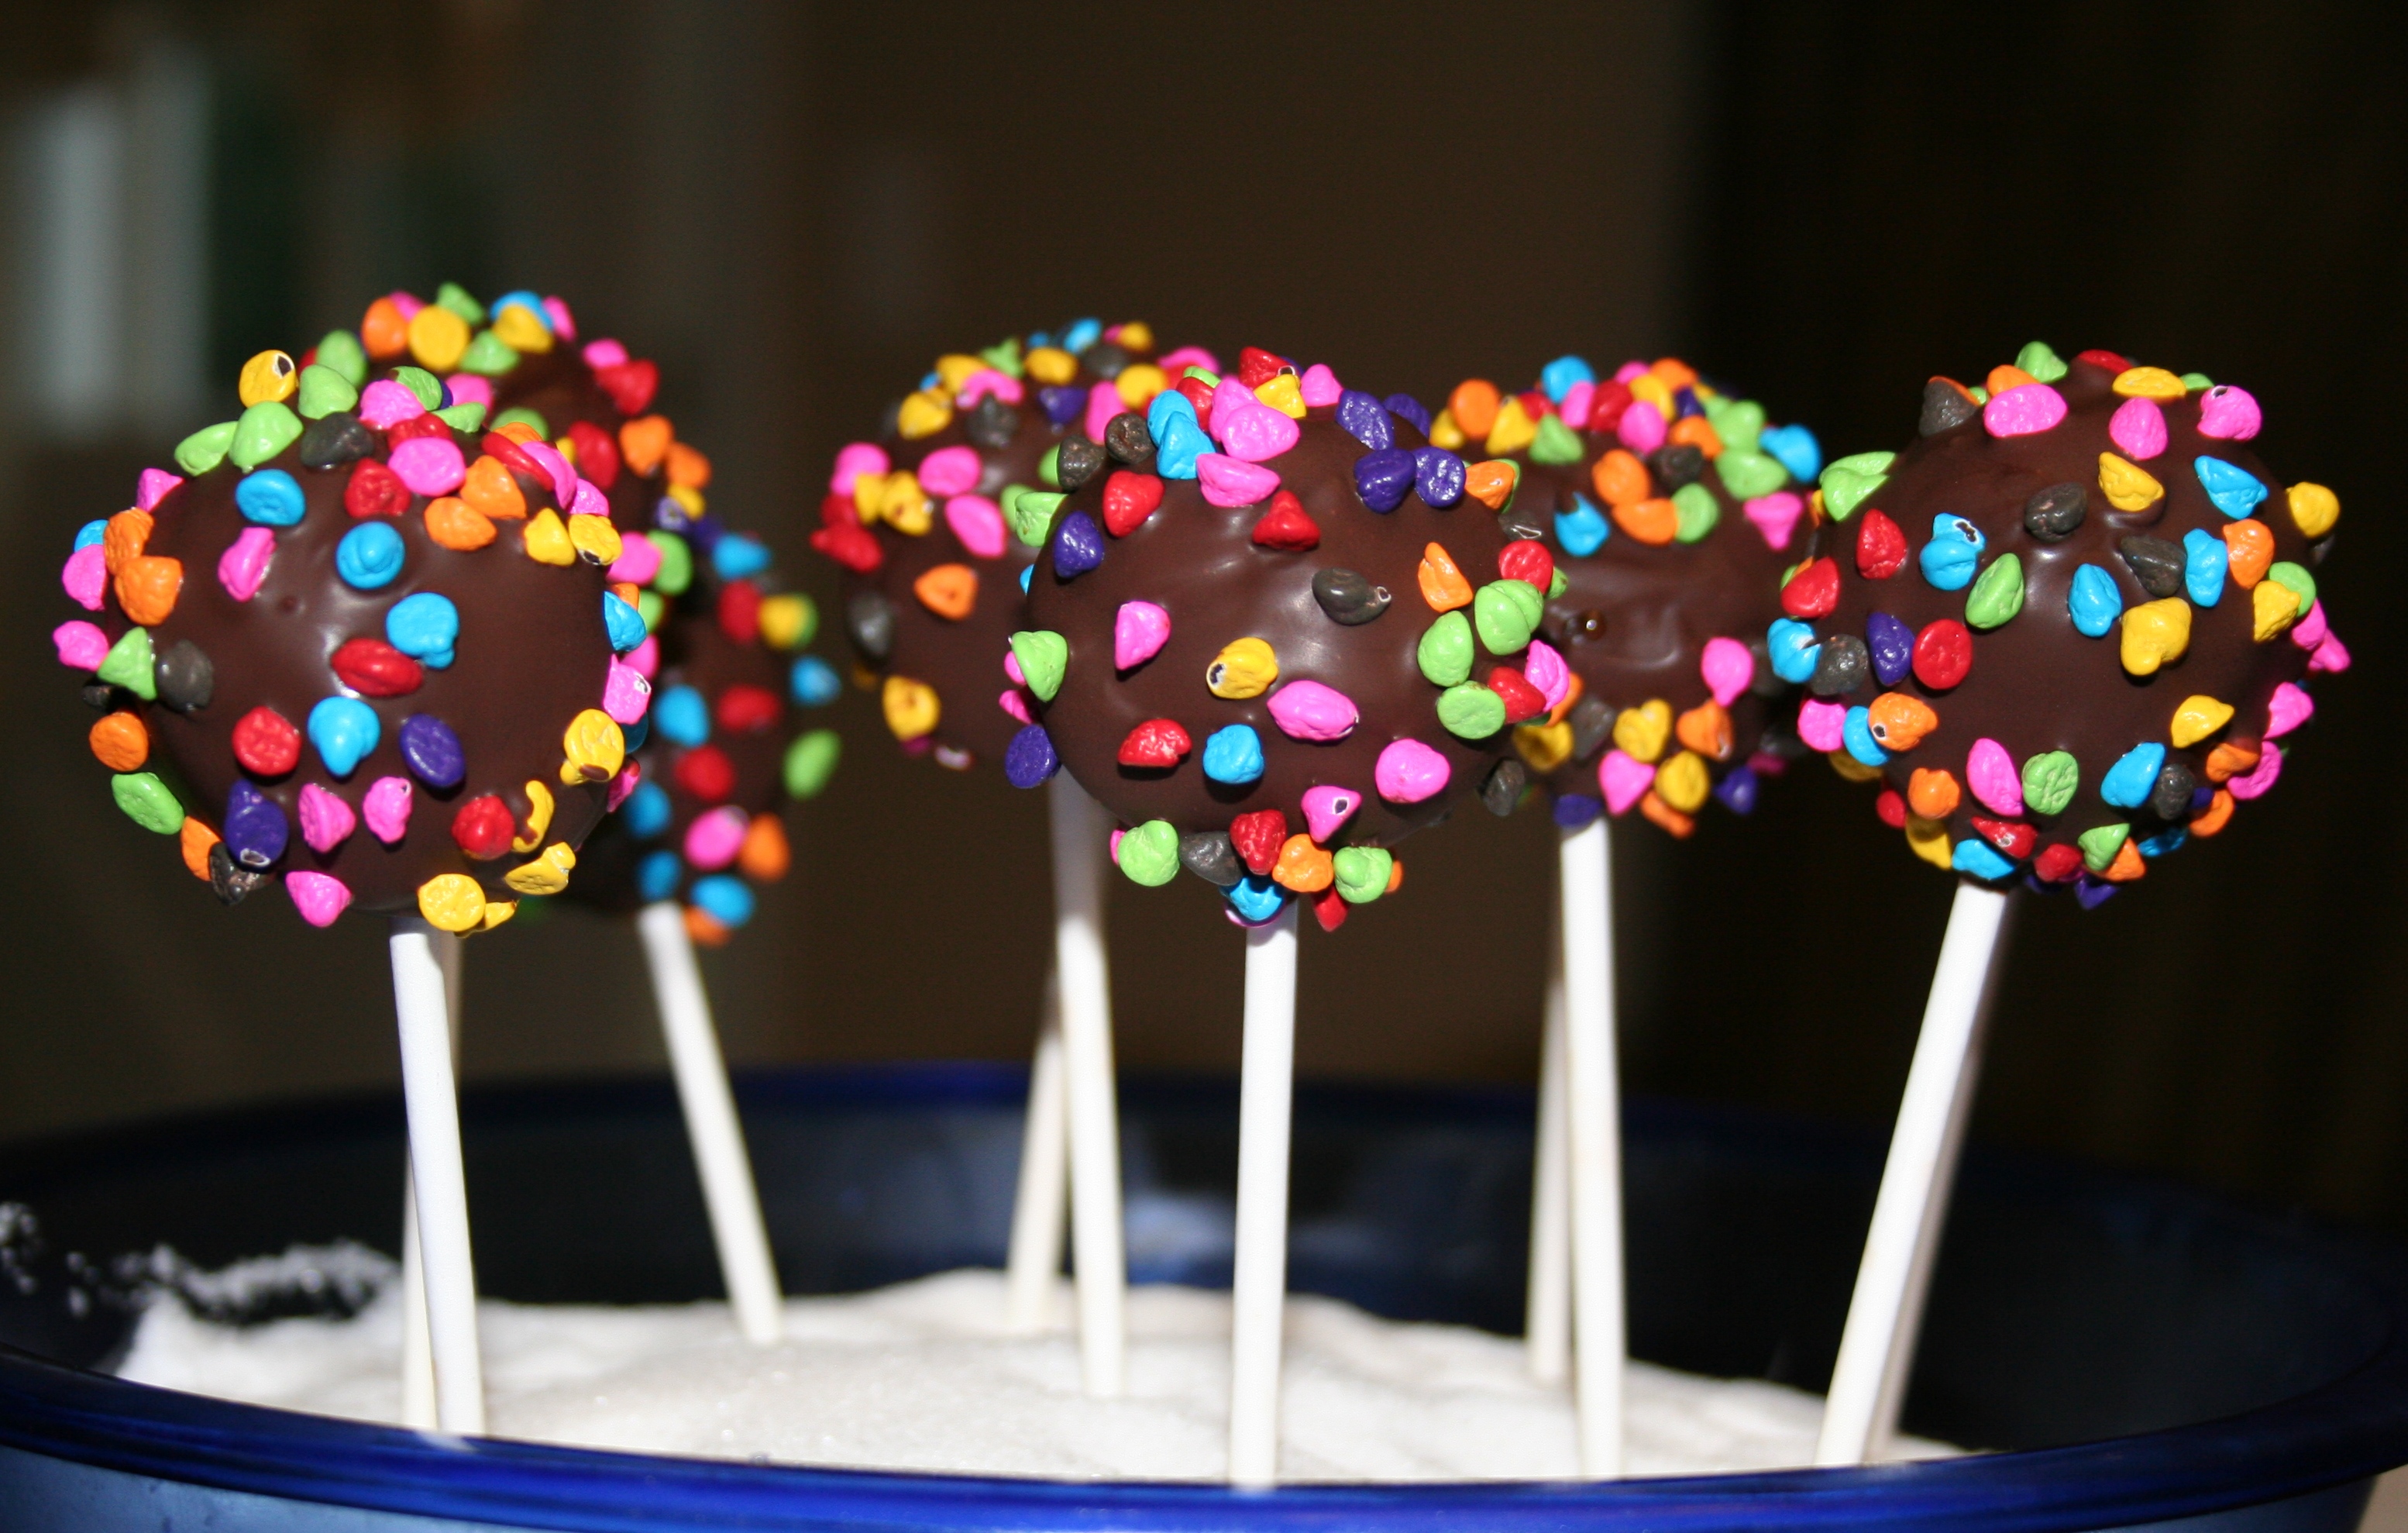
Cake Balls!!! These were easy–no shaping involved. And I love these Wilton Rainbow Chips!! I can’t decide which are cutest, but I think I love these the most!

Using Adobe Acrobat to Add Watermarks to Pictures

Creating and adding a watermark to your images posted online can be a source of frustration for many, myself included. Photoshop is one way to go, but I’m not fluent in it, and not everyone has the program available to them.

Recently, I came across an easy way to add a customized watermark to my images using Adobe Acrobat (see here for free download information).

Click on any of the images below to enlarge.

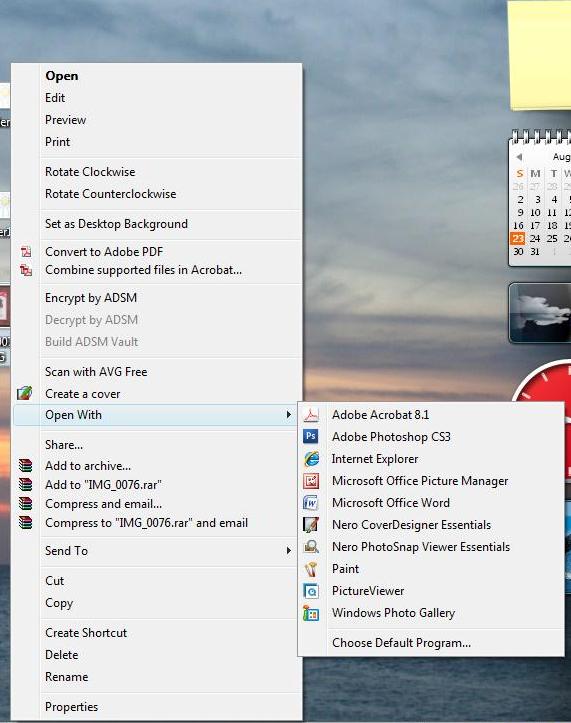
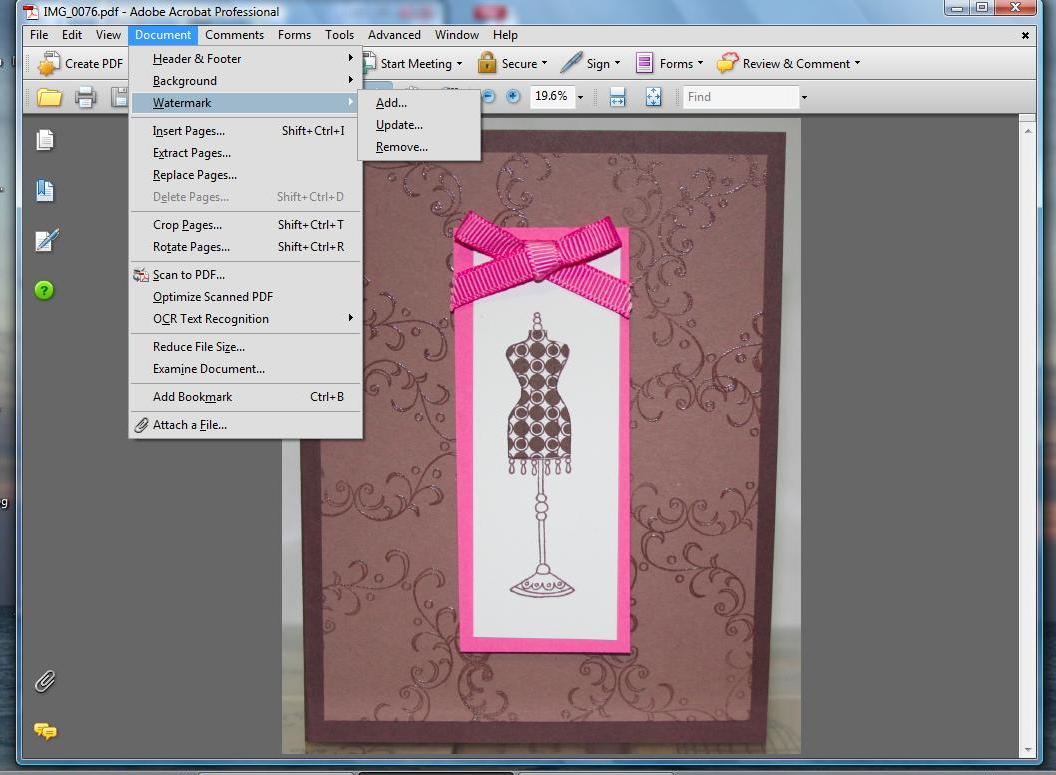
Step 1: Open your image file with Adobe Acrobat. Right click on the image file and choose “Open With” Adobe Acrobat.

Step 2: Select “Document” from the menu bar and drop down menu will appear. Select “Watermark” and then click on “Add”.

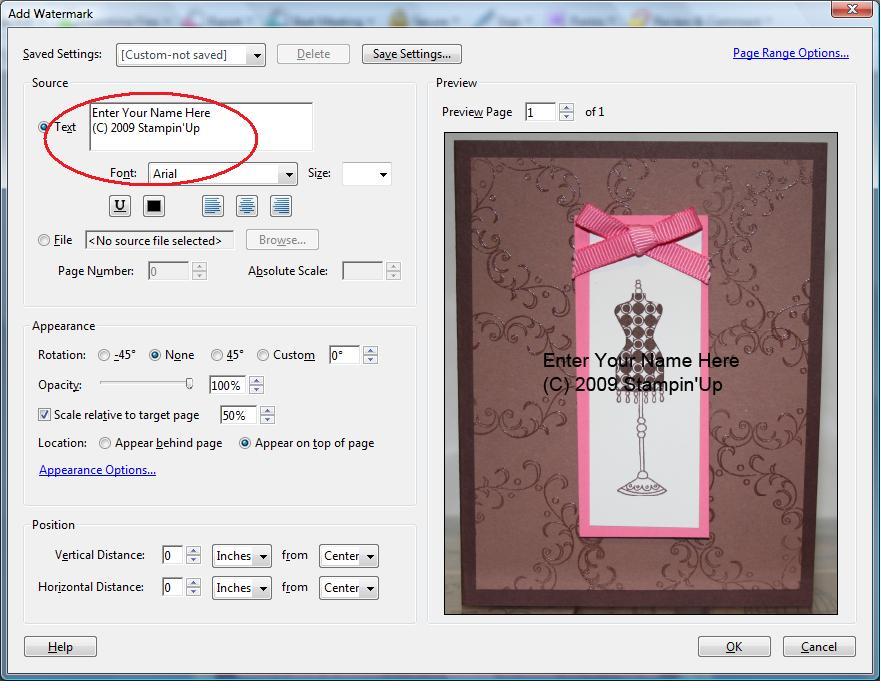
Step 3: “Add Watermark” window will appear. In the text box, enter your name and copyright information. (See red circled area below).

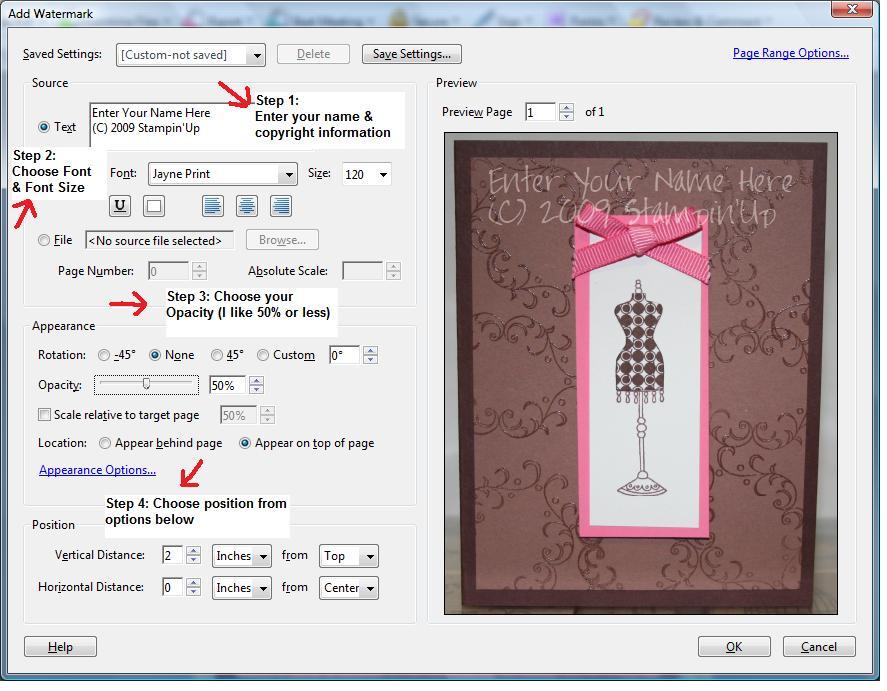
Step 4: Customize Watermark font, size, color, opacity, and location. After (1) entering your name and copyright information in the Text box, (2) Select a font from the drop down menu below. I chose Jayne Print and font size 120 point. Below the font box, choose your color (I chose white).  Next, (3) adjust the opacity setting, which makes your watermark more transparent and less likely to interfere with your picture. Finally, (4) choose the position of your watermark using the Vertical and Horizontal controls located at the bottom of the Add Watermark window.

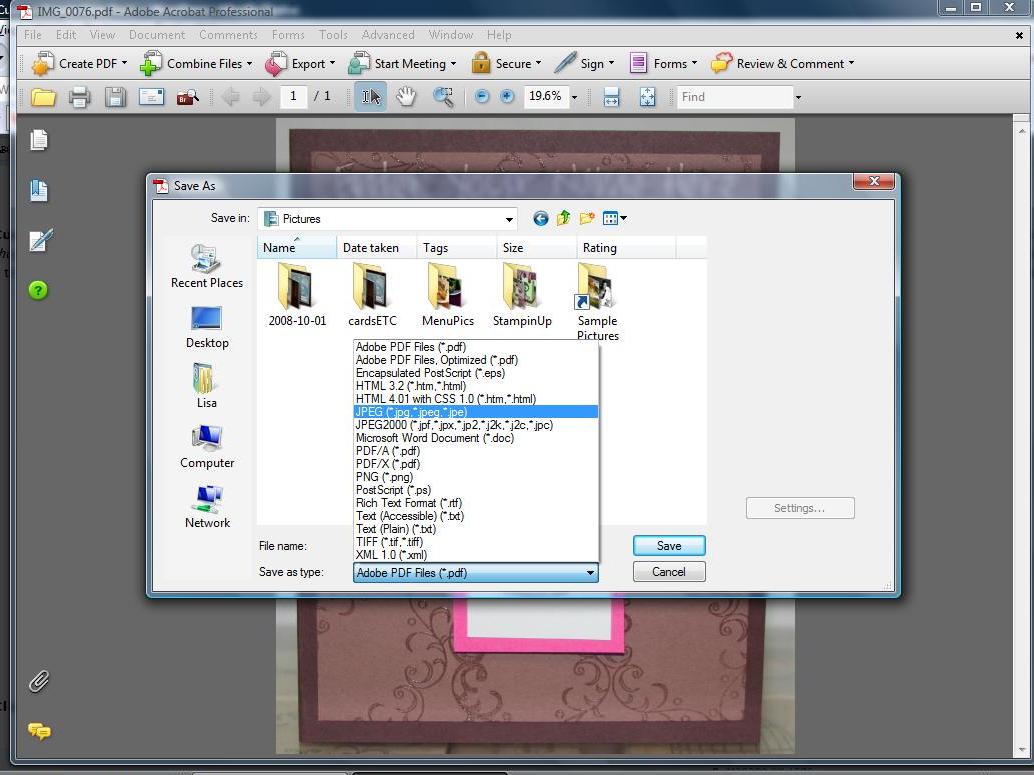
Step 5: Click OK and Save as a .JPEG file. When you’re pleased with the outcome (preview is conveniently located on the screen to the right) click OK to apply the watermark. You can then save the file as a .JPEG by clicking “File/Save As”. At the bottom of the “Save As” screen select “Save as Type” and choose .JPEG from the menu. Click Save.

That’s it. You can save your watermark information for next time by selecting “Save Settings” at the top of your “Add Watermark” screen.

Bad Behavior has blocked 422 access attempts in the last 7 days.

css.php